|
The Best Traditional Rollout Sugar Cookies - from Family Christmas OnlineTM
This is truly a family cookie recipe, partially because it's hard to do more than a single batch without help. And the "help" you need is the kind that children can easily provide - the role of decorating the cookies with colored sugar or store-bought sprinkles, after you cut them out and put them on the cookie sheet, but before they go into the oven.
When I bake from this recipe, I usually double it, because it's almost as easy to bake two batches as it is to bake one. When I bake at Christmas, and have the help of at least one (usually two) offspring, I triple the recipe. But that extra batch seems to take a lot of time if you're doing it by yourself, so I wouldn't recommend this approach starting out.
Actually, rollout cookies take more time than most other kinds. But there are offsetting advantages:
- Rollout cookies can be baked for almost any season or event - cookie cutters are available, not only in Christmas shapes, but also in shamrocks, oak leaves, eggs, playing card suits, and many other shapes. One of my favorite, but hard-to-find shapes is the groundhog. When we get a chance to make them, Groundhog Day cookies are always a hit with our family, friends and coworkers. And they have the advantage of only needing one color of sugar.
- If you have small children, rollout cookies have another advantage - if you make snowmen, bells, trees, and trains, your little ones will be just as excited about making "four different kinds" of cookies, as if you had made four entirely different recipies.
- Rollout cookies are unmistakably home-made and "hand-crafted," which somehow says "you care."
- Finally, homemade rollout cookies have a distinctive taste that you just cannot get from any other kind of cookie. And at times in our lives when memories are important, long-remembered tastes and smells often bring back the best memories of all.
As you can probably tell, I've been sprinkling sugar on rollout cookies since I was a toddler; "helping" my mother bake these is one of my favorite memories of time spent with our mother. Since I became a dad, I've baked these cookies with our own children, and I hope they remember our little projects with half as much pleasure. Since this particular kind of cookie baking is far more art than science, we are bringing these instructions to you, complete with far more illustrations and hints than you'd ever find in any recipe book, to help you build great memories with your own family.
Note: If you are completely new to baking, you might want to start with a single batch and do a "dry run" before you embark on a big, multibatch project. And please contact us with any questions, suggestions, or corrections. If you have unique cookie decorating ideas, let us know - we may have time later to add a "gallery" of sugar cookie designs.
To make this page as useful as possible, we've broken it down into the following subsections:
To complete this project, you will need the following equipment: (you probably already have most or all of it, but I don't want you to have to run to the store in the middle of your project because I've made an unfair assumption about what you have in your kitchen cabinets.)
- A mixing bowl big enough to hold all the dough you plan to make. A four-quart mixing bowl is adequate for a double-batch or less. I use an 8-quart stainless steel pot for a triple or quadruple batch.
- Three or more little bowls for making colored sugar
- A rolling pin (If you can get one that's about 4" in diameter, that works better than a smaller one.)
- A flat, clean, scratch-resistant surface you can use to roll out the dough and cut out the cookies. We use an Amish-made oak table that seems impervious to the kind of minor damage you can inflict with cookie cutters and metal spats. Some people use a Formica counter top. If you have a marble table-top or counter-top that's great, too. Tupperware (and probably Rubbermaid) makes a plastic sheet you can unroll to cut cookies on as long as you have a flat place to unroll it. At the very worst case, you may use one of your cookie sheets to roll out and cut cookies, but using a cookie sheet for something besides baking cookies may make the job take longer unless you have spares.
- Cookie cutters. In the "worst case," you can always use a tumbler upside down to cut out circles and then decorate them as Christmas balls or the like. At Easter, Mom used to cut out cookies with a flexible plastic cup she squoze slightly to make into an egg shape. (Is "squoze" a word?) More on cookie cutters later.
- A wire cooling rack, some sort of wire framework that you can spread the cookies out on when they're ready to come off the pan. If you don't have a cooling rack, you can set the whole pan somewhere and let it cool, but that may make your job take longer unless you have spares.
- A grill spat or similar metal spatula that you can use to transfer the cutout, but unbaked cookies from your rollout surface to your cookie sheet. If you have Teflon�-coated cookie sheets, you may want to use a non-scratch spatula for removing the cookies. But getting the unbaked cookies off your rollout surface while maintaing their shapes will take a sharper edge than most non-scratch spatulas have. (So will moving complex shapes that haven't quite cooled of the cookie sheet.)
- A half-cup or one-cup measuring cup
- A measuring tablespoon
- A measuring teaspoon
- A sturdy tableware teaspoon strong enough to smash food coloring into white sugar
- Cookie sheets. Three large ones are recommended. This way you can have two sheets in the oven while the kids are decorating the third. Of course you can get by with fewer shets, but the job may take longer, especially if you're doing multiple batches.
- An oven. Okay, I know that should be obvious, but I had to say it somewhere.
- An electric mixer. We use a hand mixer. although the very last phase of mixing the dough does stress it. Mom always used an ancient Sunbeam countertop mixer (the kind with Bakelite knobs), which is faster and more reliable. But, we don't have room for such a device in our kitchen.
- Airtight container(s) to store the cookies in. This is especially important in the winter when our homes tend to be dry.
In addition to the recipe itself, which is listed below, here are some supplies you probably have on hand, but will definitely need to get by the time you start this project: (Again, you probably have these, but I don't want you to have to make a run to the store mid-project)
- Flour. Yes, this is listed in the recipe, but you'll need extra flour, at least two cup's worth while you're making the cookies.
- White Sugar. Yes, this is listed in the recipe, but you'll want to have a little extra sugar to color for decorations, unless you buy pre-colored sugar or the like.
- Food Coloring. A little four-color package from your grocery store's baking aisle will last for years. I prefer Durkee or some other "name brand."
- Room-Temperature Margarine. Okay, this isn't a supply per se, it's part of the recipe. But I put it in early so you would know to figure out how much margarine you will need and leave the right number of margarine sticks out overnight in preparation for baking.
This recipe is very similar to the one in the classic Pillsbury recipe book. For all I know my mother got her recipe from her Pillsbury book way back when. But I've added a couple twists over the years. I've also witnessed people trying substitutions (and tasted the results), so if you don't mind, I'll add appropriate comments based on those experiences. The following quantities are based on one batch. I usually make two, and for Christmas, I make three or more.
- 1 Cup of Sugar - any name-brand white sugar will do, as well as most grocery store brands.
- 3 Cups of Unsifted Flour - any name-brand flour will do, as well as most grocery store brands. "Self-rising" flour isn't particularly helpful, but it will work if that's what you have (you may want to cut back on the salt a little, though).
- 2 Sticks of Margarine that have been allowed to warm slowly to room temperature (one cup's worth in case you wondered). I prefer a good old-fashioned stick margarine such as Blue Bonnet. Most grocery store brand stick margarines will work in a pinch. Here are some other things I have seen folks trying and suggestions for making such substitutions work:
- Real stick butter - this works, but you may want to add about half again as much salt, since most butter doesn't have as much salt as most margarine. Also, the cookies tend to spread out more in the oven because the butter melts more quickly than margarine, before the dough has started to firm up. Chilling the dough before you work it helps. Frankly, though, butter doesn't make these taste much better to most people, so if you have a choice, save your money and reduce the cholosterol.
- Tub margarine or butter substitutes - These are whipped and usually have a higher percentage of water, so they don't combine with the sugar in quite the same way while you're beginning the recipe. If you do have to use one of these, consider using about a quarter again as much as the recipe calls for and decreasing the amount of milk by about a third.
- Crisco butter-flavored shorening - You'd think that would be a good substitute since it's chemically very similar to margarine. But it has a slightly lower melting point, so you may have the "cookies spreading out" before they start to bake problem, like you do with butter. Plan on chilling the dough before you work it. Also, there's no salt to speak of in this stuff (unlike margarine), so you'll probably want to double the salt if you use this.
- 1 Egg preferably large
- 1 Teaspoon of Vanilla Extract - The real stuff combines better with the margarine than the fake stuff, and tastes better overally, but you can use the fake stuff in a pinch and you probably won't notice the difference.
- 3 Tablespoons of Milk or Cream and/or Sour Cream - I prefer to use half milk and half non-fat sour cream. The sour cream gives a much richer flavor, but if you use all sour cream the dough won't have quite enough moisture. I have never tried soy milk; if you have and it works, please let me know.
- 1/2 Teaspoon of Salt - This is needed not only for taste, but also to enhance the rising process. I've always used table salt - if you have tried something else and found it useful, let me know. If you use real butter, add a little more salt, if you use butter-flavored shortening, double the salt.
- 1 1/2 Teaspoons of Baking Powder - Trying to keep a tin of baking power fresh between uses is very difficult. This is why I always use a little more baking powder than the Pillsbury recipe calls for. If your baking powder is brand new, one teaspoon should do you. You wouldn't want to go more than double, though, as it makes the dough bitter if you use too much.
Obviously, you can simply double these amounts to double the recipe, and so on.
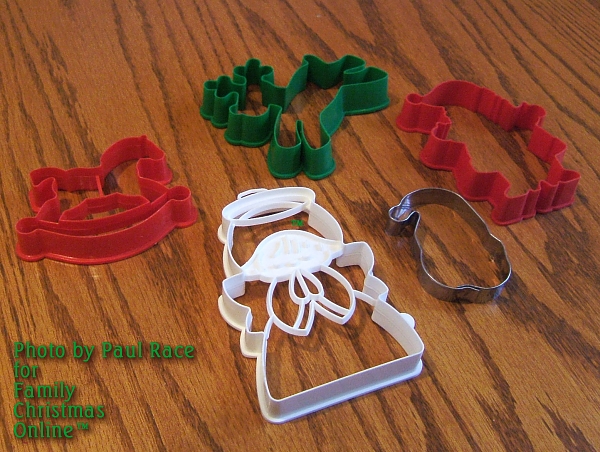
If you inherited some ancient antique cookie cutters, great! Those old stamped aluminum ones your grandma used were popular largely because they actually worked. With the advent of plastic came "cookie cutters" that looked good in the store but didn't necessarily make the best cookies, although there are a few exceptions. We'll briefly outline the good, the bad, and the high-maintenance. Your mileage and preferences will vary, of course.
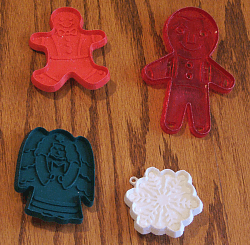
| The Good: Look for cookie cutters that are a reasonable size, averaging around three inches in each dimension, with few or no points or long "appendages" that will be prone to breakage. | 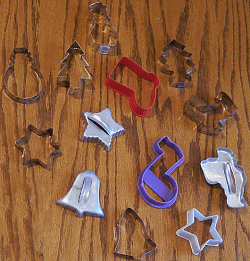 |
| The Bad: Avoid huge cookie cutters that will use half your dough in one big hunk, unless you have specific plans for those huge cookies. Otherwise the smallest child in the room inevitably grabs the biggest cookie, takes two bites and drops it on the floor. Several medium sized-cookies would have been a better investment of your time, energy, and ingredients. Also, avoid cookies with appendages such as the ball on the Santa head in the photo to the right or the reindeer's antlers. Even if they survive the baking process, the chances of them surviving long in the cookie jar are about zilch. Finally, avoid cookie cutters that force you to "punch" out bits like the blank between the rocking horse's belly and runners. If you have to spend 30-60 seconds more cutting out each cookie because you chose a high-maintenance cutter, you may get tired of the process much sooner than you would have with "user-friendly" cutters like the ones at the top.
| 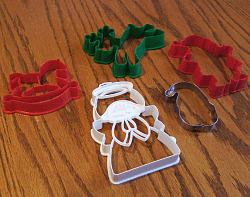 |
| The High-Maintenance: That said, some cookie cutters that take a little extra effort produce a cookie that is worth the extra effort. An example is the old Hallmark Snowflake cutter in the photo to the right. Used properly , you can create an unusual effect without THAT much extra effort. More on that later.
|  |
Again, if you don't have any cutters, you can use drinking glasses to make circles, or if you have a collection of cutters that are difficult to work with, don't panic - these are all only suggestions and examples. Rinse out the cookie cutters you plan to use so they'll be dry by the time you need them. Also, if you have helpers, you can get them started making colored sugar while you are putting the dough together.
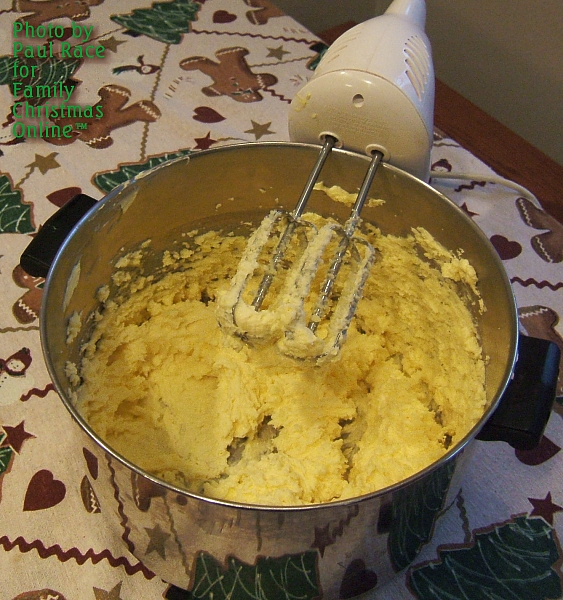
In case you've never done anything like this before, we've included photos of each stage you can click on to see a blowup to see how your project compares to ours. In this case, we baked a triple batch, so there's a lot more stuff in the pot than you'll have the first time you make these, but it should give you a general idea.
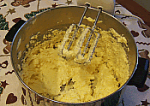
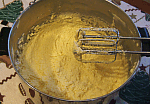
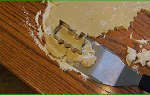
 Dump the stick margarine or whatever substitute you choose into the mixing bowl or container of your choice. If you must nuke your margarine to make it soft enough to work, try to keep it from becoming liquid - it will react differently with the sugar and it won't whip up. That said, if you find yourself using melted butter or margarine, just count on chilling the dough before you start the rolling out process, and you'll hardly notice the difference in the final product. Dump the stick margarine or whatever substitute you choose into the mixing bowl or container of your choice. If you must nuke your margarine to make it soft enough to work, try to keep it from becoming liquid - it will react differently with the sugar and it won't whip up. That said, if you find yourself using melted butter or margarine, just count on chilling the dough before you start the rolling out process, and you'll hardly notice the difference in the final product.
 Add the sugar. Add the sugar.
- With your electric mixer, use a high speed to whip the two together as much as you can. Usually after a couple of minutes you'll get to a point where you can tell the consistency of the stuff isn't changing any more.
 Add the eggs, vanilla and cream, and beat it again, until it stops "fluffing up" any more. Add the eggs, vanilla and cream, and beat it again, until it stops "fluffing up" any more.
- Add about half of the flour, all of the salt and all of the baking powder. I prefer to "stir" the salt and baking powder into the flour a little before I start mixing it into the wet stuff. If you don't mind dirtying another bowl, some folks mix all the "dry" ingredients together separately, then add them into the mix. If you're going to go right from this stage to the cookie-rolling-and-cutting-and-baking stage, now is a good time to turn your oven to 350F. The shelves in your oven should be as close to the middle as possible.
 By the time you add the last bit of flour to the mix, your hand mixer is probably starting to strain (and maybe smell bad), unless your dough is too warm to work. Once you're sure the dough is mixed evenly, set it aside, and clean the dough off the beaters. If the dough is soft and gooey, stick it in the refrigerator for a half hour or so. If it's slightly "stiffer" than, say, new Play Doh, it's ready to work. That said, if your kitchen is warm, you might want to stick the dough in the refrigerator anyway to keep it from getting too soft while you're getting everything else ready. By the time you add the last bit of flour to the mix, your hand mixer is probably starting to strain (and maybe smell bad), unless your dough is too warm to work. Once you're sure the dough is mixed evenly, set it aside, and clean the dough off the beaters. If the dough is soft and gooey, stick it in the refrigerator for a half hour or so. If it's slightly "stiffer" than, say, new Play Doh, it's ready to work. That said, if your kitchen is warm, you might want to stick the dough in the refrigerator anyway to keep it from getting too soft while you're getting everything else ready.
Note: At this stage in the process, my mother always tasted the dough to see if it "tasted right." Before I learned that it was dangerous to eat raw rollout sugar cookie dough, I learned that the dough has such a distinctive flavor that an experience baker can tell from the taste whether anythings' been left out. Since those halcyon days, though, I have been informed that the raw eggs in the dough can make you deathly ill. So in spite of its potential usefulness, be absolutely certain not to taste the raw dough, especially when your helpers are watching, because you don't want to be a bad example.
- Turn the oven on to 350 degrees if you haven't already. Again, the shelves in your oven should be as close to the middle as possible.
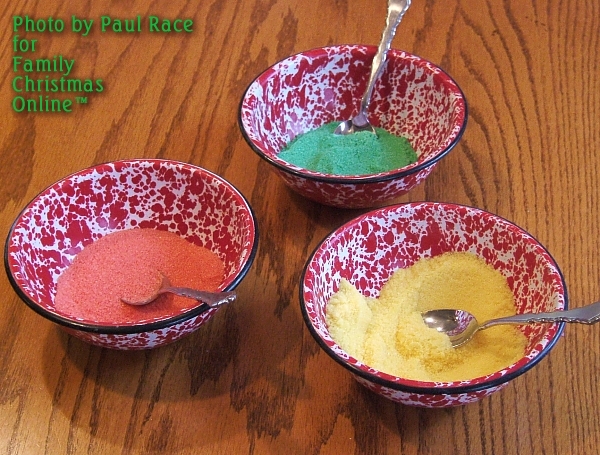
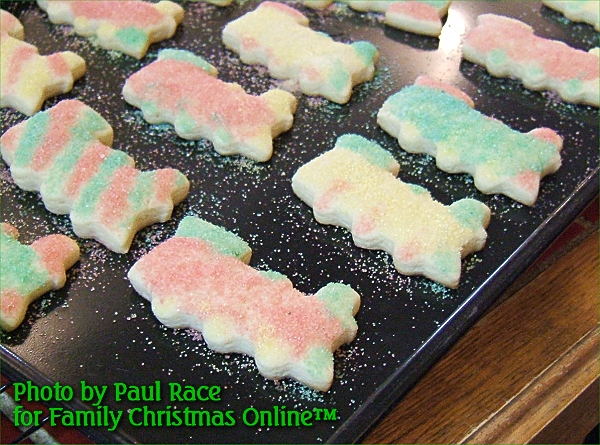
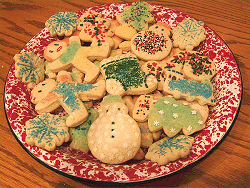
Best case: You delegated this step and it's done by the time you get the dough ready to go. Obviously, if you prefer the look of store-bought decorating sugar, you can skip this step anyway. But for the real old-fashioned look this can't be beat. The cookies in our photos used a mix of home-made sugar and store-bought sprinkles.
- Decide how many colors you want.
- For each color, put about a quarter of a cup of sugar into a bowl. If you're doing a quadruple batch, you might use a third of a cup.
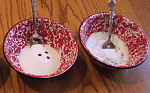 Add at least three drops of food coloring to each bowl. (some colors require as many as five drops, but you can always add coloring as you're working). Add at least three drops of food coloring to each bowl. (some colors require as many as five drops, but you can always add coloring as you're working).
- Using the back of the spoon, smash the food coloring down into the sugar, and keep smashing until the sugar is a consistent color. At first it will look like all you're doing is breaking your colored dots up into little pieces (like the green dye in the right in the photo above). But as you keep smashing out each "hunk" of dark color you see,
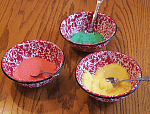 you'll see more consistent color. If you do get impatient and add too much food coloring before you get the existing color smashed all through the mix, you can always add white sugar to tone it down again. Of course you may be using colored sugar in your coffee for the rest of the week. you'll see more consistent color. If you do get impatient and add too much food coloring before you get the existing color smashed all through the mix, you can always add white sugar to tone it down again. Of course you may be using colored sugar in your coffee for the rest of the week.
- When each color is acceptable to you, put the food coloring away and move the bowls near to where the cookies will be decorated.
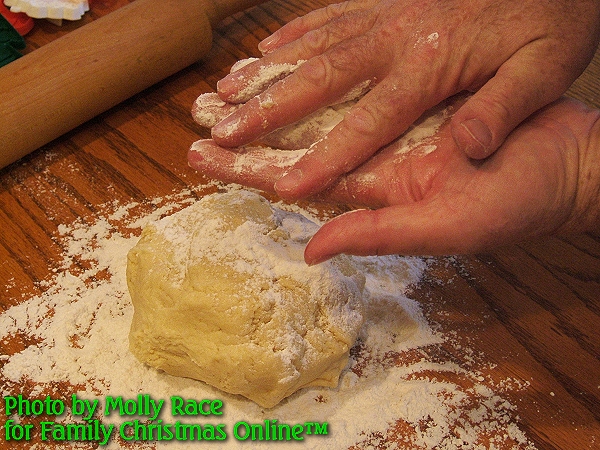
When you have everything ready, including your workspace and your helpers, and your dough is at least as firm as new Play-Doh, it's time to start the production process.
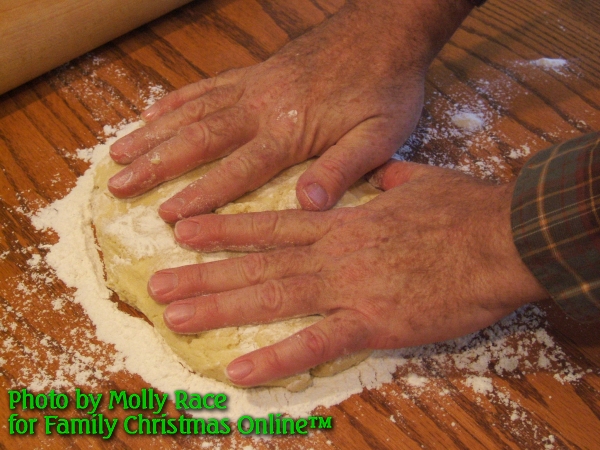
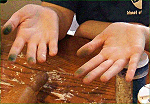
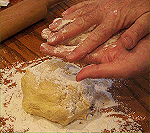 Spread a thin layer of flour on your work surface. Dust your hands with flour, too. Then take a small quantity of flour in your hands and rub it over the rolling surface of your rolling pin. This keeps the dough from sticking to these surfaces too much, unless it's too wet to work anyway. Spread a thin layer of flour on your work surface. Dust your hands with flour, too. Then take a small quantity of flour in your hands and rub it over the rolling surface of your rolling pin. This keeps the dough from sticking to these surfaces too much, unless it's too wet to work anyway.
- Pull a grapefruit-sized quantity of dough from the bowl. Before you put it on the table, roll it into a large ball with your hands.
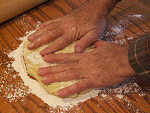 Put the dough ball on the floured table, sprinkle it with some flour on top and begin pressing it out. Put the dough ball on the floured table, sprinkle it with some flour on top and begin pressing it out.
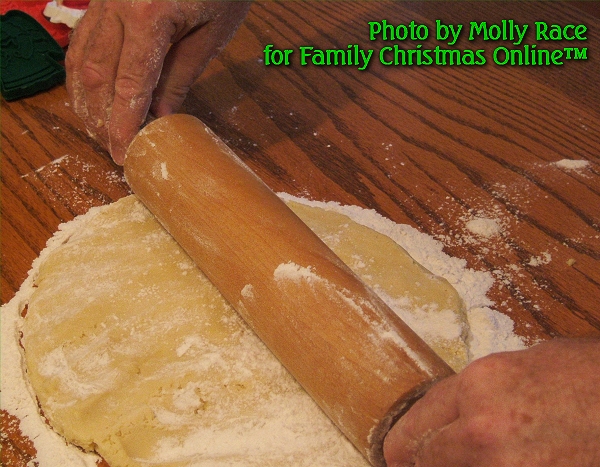
- With the rolling pin, press the dough ball down a little at a time, spreading the dough out in all directions. After you have a "fat pancake" shape, sprinkle a little more flour on top of the dough and spread it around to keep it sticking to the rolling pin so much. If the dough keeps sticking no matter what you do, you may need to chill it again, though.
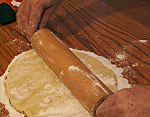 Keep alternating directions with the rolling pin so that the dough continues to spread evenly in all directions. When it's between 1/4 and 3/8" thick everywhere, you're ready to start cutting cookies. Note: The exact thickness of the dough isn't critical, but it does help to be consistent - otherwise you'll have thin and fat cookies on the same cookie sheet in the oven, and the thin ones may start browning before the fat ones are even done. Keep alternating directions with the rolling pin so that the dough continues to spread evenly in all directions. When it's between 1/4 and 3/8" thick everywhere, you're ready to start cutting cookies. Note: The exact thickness of the dough isn't critical, but it does help to be consistent - otherwise you'll have thin and fat cookies on the same cookie sheet in the oven, and the thin ones may start browning before the fat ones are even done.
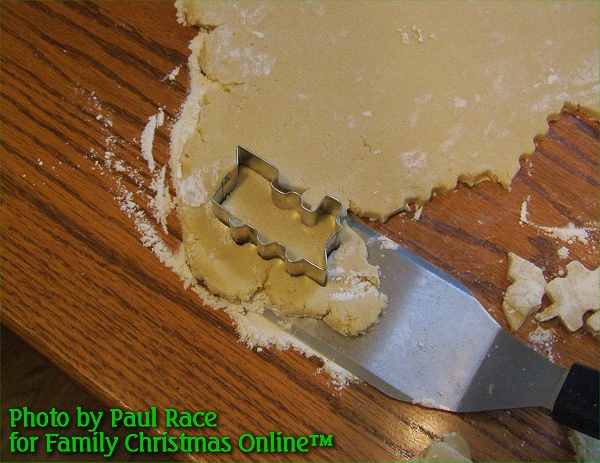
- Assuming you have two shelves in your oven and three cookie sheets, choose cookies that will be easy to decorate in a hurry for your first two trays. That way you can get two cookie sheets worth of cookies started fairly quickly before your decorators start concentrating on the more complicated cookies. How you use the cookie cutter depends on the kind of cutter you're using and the consistency of your dough:
 If your cookie cutter is deeper than the dough, or if it's just a silhouette, simply press it through the dough to the work surface. If your dough is well-chilled, you could conceivably punch out all the cookie shapes, then use your grill spat to transfer them to the cookie sheet. If it is a little too soft for that, you may need to move each cookie separately, sliding the grill spat under it while the cookie cutter is still in place. If your cookie cutter is deeper than the dough, or if it's just a silhouette, simply press it through the dough to the work surface. If your dough is well-chilled, you could conceivably punch out all the cookie shapes, then use your grill spat to transfer them to the cookie sheet. If it is a little too soft for that, you may need to move each cookie separately, sliding the grill spat under it while the cookie cutter is still in place.
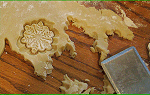 If your cookie cutter is designed to put a shape in the top of the cookie (like the third cookie cutter photo above), make certain the cutter is absolutely dry, then press it into the flour jar, and knock it against the edge to knock the excess loose. Also, spread a thin layer of flower across the top of the dough before you press the cookies. This will help the cookie release from the cutter, and the thin layer of flour on the dough won't be noticeable anyway once the cookie bakes. Then press the cutter all the way down, which may result in dough getting forced out the sides. When you pick the cutter up, the cookie shape should stay on your work surface. If it doesn't try using more flour next time. You will probably have to get these up one at a time with the spat, since pressing them down disturbs the rest of the dough. If your cookie cutter is designed to put a shape in the top of the cookie (like the third cookie cutter photo above), make certain the cutter is absolutely dry, then press it into the flour jar, and knock it against the edge to knock the excess loose. Also, spread a thin layer of flower across the top of the dough before you press the cookies. This will help the cookie release from the cutter, and the thin layer of flour on the dough won't be noticeable anyway once the cookie bakes. Then press the cutter all the way down, which may result in dough getting forced out the sides. When you pick the cutter up, the cookie shape should stay on your work surface. If it doesn't try using more flour next time. You will probably have to get these up one at a time with the spat, since pressing them down disturbs the rest of the dough.
- Your decorators can begin on the cookies as soon as they're on the tray. Mine usually start while I'm still cutting out cookies, unless I get ahead of them.
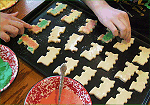 Of course how they decorate depends on what kinds of decorations you have and how artistic they're feeling. Of course how they decorate depends on what kinds of decorations you have and how artistic they're feeling.
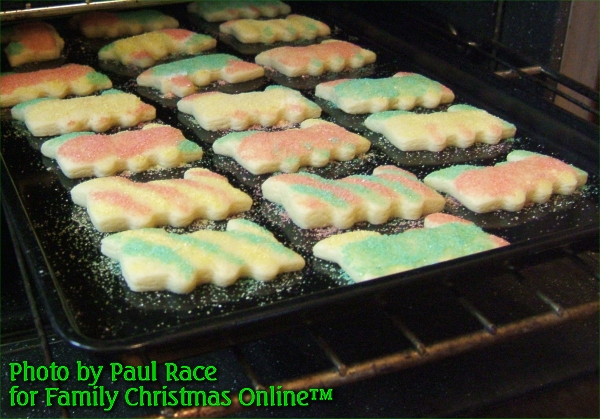
- Our most basic decoration consists of picking up a pinch of colored sugar and sprinkling it across the cookie.
- If you have several kinds of sugar or decorations, they can be used in any combination.
 If you used the kind of cookie cutters that press shapes into the top of the cookies, and your cookies are firm, you can rub a dark color into the little depressions. Sometimes my decorators do that, then sprinkle another color over, but we don't have any photographs of that. Still, you can see that this little Hallmark snowflake makes a very charming cookie when it is used right. This is the case of a slightlyhigher-maintenance cookie cutter that is worth the extra effort. If you used the kind of cookie cutters that press shapes into the top of the cookies, and your cookies are firm, you can rub a dark color into the little depressions. Sometimes my decorators do that, then sprinkle another color over, but we don't have any photographs of that. Still, you can see that this little Hallmark snowflake makes a very charming cookie when it is used right. This is the case of a slightlyhigher-maintenance cookie cutter that is worth the extra effort.
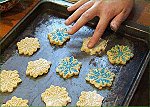
- When the first tray is decorated, put it in the oven on the middle rack. If you have two racks, put it on the rack that is higher (remember both racks should be as close to the vertical center of your oven as necessary). You'll want to check this a time or two while you're preparing the next tray:
- If it's way too low, for example, the cookies could just sit there or, worse yet, spread out as the margarine melts too gradually, so that by the time they start baking, they've lost much of their shapes.
If your oven's thermostat is way too high, your cookies could burn on the edges before they're done in the middle.
On our old Jenn-aire, I usually notch the temperature to just a little lower than 350 to get the right balance. After your first batch is finished, you may want to adjust your oven's thermostat as well. Note: Ovens are more likely to be hotter than they should be than cooler, so don't be surprised if that's the case for yours.
 You'll notice your first batch of cookies "poofing up." How much they "poof up" depends on all sorts of things, including how fresh your baking power was, how much you were able to whip up the margarine and sugar, etc. If they start to turn brown around the edges before they poof up, try cranking the heat down a little. If they don't "poof up" at all, your baking powder may be weak. Unfortunately you can't do much about that now. But don't worry, your cookies will still look and taste great. You'll notice your first batch of cookies "poofing up." How much they "poof up" depends on all sorts of things, including how fresh your baking power was, how much you were able to whip up the margarine and sugar, etc. If they start to turn brown around the edges before they poof up, try cranking the heat down a little. If they don't "poof up" at all, your baking powder may be weak. Unfortunately you can't do much about that now. But don't worry, your cookies will still look and taste great.
- If you have a second sheet of cookies ready to bake while the first sheet is still in the oven, set it on the lower rack.
- Usually, whenever I check on a sheet of cookies, I rotate the cookie sheet 180 degrees. This helps compensate for ovens that heat unevenly. (As an example, the cookies near the door of our old Jenn-aire bake faster than cookies near the back. Go figure.)
 Usually if a cookie starts to turn even a tiny bit brown on any edge, that means it's done. Ideally, you should pull them out just before they start to turn even a tiny bit brown, but that's a skill that takes time to acquire. If you have a non-stick cookie sheet, a cookie that's finished should slide across the surface, maintaining its shape. with just one tap. Unfortunately, it's possible for some of the cookies to be done while some of them aren't, especially if they are different sizes or the dough was rolled out to different thicknesses. That said, a cookie doesn't have to show any brown at all to be done. If any of the cookies are starting to brown a little at the edges, and the rest of them look fairly firm, they're probably all done. Take them out. If there is a cookie sheet on the lower rack, move it to the middle rack. If you have a third cookie sheet ready to go, set on the lower rack. Usually if a cookie starts to turn even a tiny bit brown on any edge, that means it's done. Ideally, you should pull them out just before they start to turn even a tiny bit brown, but that's a skill that takes time to acquire. If you have a non-stick cookie sheet, a cookie that's finished should slide across the surface, maintaining its shape. with just one tap. Unfortunately, it's possible for some of the cookies to be done while some of them aren't, especially if they are different sizes or the dough was rolled out to different thicknesses. That said, a cookie doesn't have to show any brown at all to be done. If any of the cookies are starting to brown a little at the edges, and the rest of them look fairly firm, they're probably all done. Take them out. If there is a cookie sheet on the lower rack, move it to the middle rack. If you have a third cookie sheet ready to go, set on the lower rack.
- When you first get the cookies out, they should be soft. If you have a simple pattern, without any particularly fragile bits, you may be able to use your grill spat to transfer the cookies to the wire racks immediately. If the cookie pattern has fragile bits, or the cookies are very soft, set the cookie sheet somewhere where it can cool top and bottom for a couple of minutes, then transfer your cookies. Note: Don't set a cookie sheet full of cookies on top of your oven (say on the burners). The residual heat coming through the burners may keep the sheet warm, and may even cause your cookies to brown unnecessarily on the bottom even as they are cooling on top.
- When your first batch has been transferred to the wire racks, examine it to see what you would change - should your dough be thinner or thicker? Should your oven be set down a tad? You and each of your helper should probably have a cookie just to be on the safe side. (Thou shalt not muzzle the ox that treads the grain, after all.)
- Scrap any loose sugar or flour from your cookie sheet before you reuse it for another batch - otherwise, the sugar will stick to the bottom of the cookies in your next batch and burn, not a nice effect.
- When the first batch has completely cooled on the wire rack, stack all the cookies in the first batch on one end to make room for the second batch, etc.
- Keep making cookies until you've used up all of the dough. The last "cookie" will probably
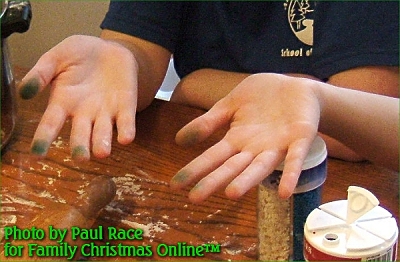
 be a glob of letover dough too small to shape into a cookie. Let your youngest helper decorate the "glob" anyway he or she wants. Then have your helpers wash their hands with soap. Chances are, there will be some food coloring on their fingers for the next day or so anyway, though. be a glob of letover dough too small to shape into a cookie. Let your youngest helper decorate the "glob" anyway he or she wants. Then have your helpers wash their hands with soap. Chances are, there will be some food coloring on their fingers for the next day or so anyway, though.
- After you've put the last cookie sheet in the oven and started cleaning up, don't forget about the last batch. Remind your youngest helper that its his or her responsibility to remind you the "glob" is still in the oven every so many minutes. If I had a dollar for every time I forgot about the last batch of cookies and let them burn . . .
- When your cookies have all cooled, transfer them to airtight containers. I usually cushion the bottom with a folded paper towel or some such.
- When you're completely done cleaning up, dole out one more cookie apiece - including the "glob." Then put your feet up and enjoy.
To return to the Favorite Christmas Cookies page, click here.
To return to the Family Christmas Recipies page, click here.
To return to the Family Christmas OnlineTM Home Page, click here.
|

 |